MySQL, PhpMyAdmin, Wordpress, SSL Certificate
Now this article will show you how to install MySQL/MariaDB, PhpMyAdmin, Wordpress on debian buster by using Dockerfile. If you wonder where the nginx installation instruction is, check out this link.
Install MySQL/MariaDB
Put commands below to your dockerfile. Then build the image and run it. Shell script will be excecuted.
RUN apt-get -y install mariadb-server
By putting commands highlighted in pink , you can start your MySQL service and see what databases in it.
In order to create database for Wordpress and configure MySQL easier, making init.sh file like below will be a great option.
MySQL config explanation
- CREATE DATABASE wordpress;
=> it’s just simply creating schema named with ‘wordpress’.
2. GRANT ALL PRIVILEGES ON ‘Schema name’.’table name’ TO ‘account name’@’host’ identified by ‘account password’ WITH GRANT OPTION;
=> Making account which can access to certain schema. In our case, we are making root account which can access to all tables in wordpress schema. And we skipped password by using mysql -u root — skip-password option from MySQL Docs.
3. FLUSH PRIVILEGES;
=> If using INSERT, UPDATE, or DELETE statements, you should tell the server to reload the grant tables, perform a flush-privileges operation. Look for this MySQL documentation and stackoverflow link.
4. update mysql.user set plugin=’’ where user=’root’;
=> Start from MySQL Server 5.7, if we do not provide a password to root user during the installation, it will use auth_socket plugin for authentication. With this configuration, MySQL won’t care about your input password, it will check the user is connecting using a UNIX socket and then compares the username. But it matters when login to mysql root from other normal linux user account. That ‘s why we add this line. If you do not add this, the result page will be look like this.

Install PhpMyAdmin
Before installing PhpMyAdmin you should install php first.
RUN apt-get -y install php7.3 php-mysql php-fpm php-pdo php-gd php-cli php-mbstringAnd then install phpmyadmin by using ‘wget’.
/var/www/html is the location where Web-server finds files for web pages when web browser(or client) requests. That is the reason why we unzip the phpmyadmin in this directory.
WORKDIR /var/www/html/RUN wget https://files.phpmyadmin.net/phpMyAdmin/5.0.1/phpMyAdmin-5.0.1-english.tar.gzRUN tar -xf phpMyAdmin-5.0.1-english.tar.gz && rm -rf phpMyAdmin-5.0.1-english.tar.gzRUN mv phpMyAdmin-5.0.1-english phpmyadmin
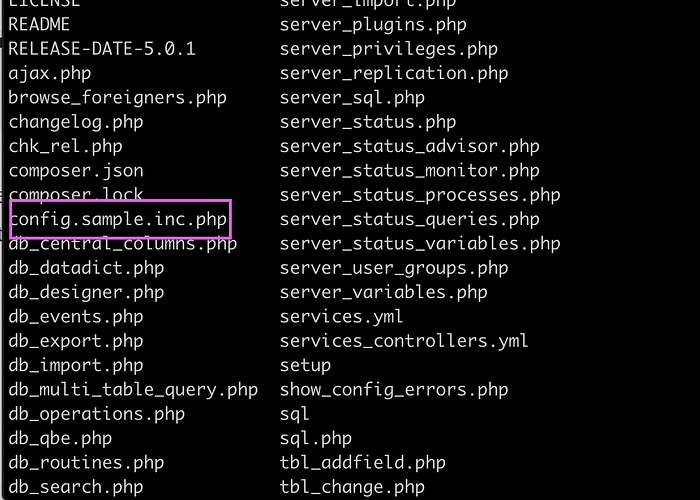
Again, build the docker image and run it. cd to phpmyadmin. You will find config.sample.inc.php file in this directory. This is the file you have to configure.

PhpMyAdmin config explanation
- I filled alphanum in blowfish_secret part(you can use any random string and number). It is a value that will be unique to your instance and use of PhpMyAdmin.
- Also set AllowNoPassword as true, so you can access PhpMyAdmin without password.
Next, move this config file to phpmyadmin folder. In my case, the file was in srcs folder.
COPY ./srcs/config.inc.php phpmyadmin
Install Wordpress
Working directory /var/www/html/ has not been changed, so we are going to get some work done here.
RUN wget https://wordpress.org/latest.tar.gzRUN tar -xvzf latest.tar.gz && rm -rf latest.tar.gz

Wordpress config explanation
I configure wordpress as below. All I did was put DB_NAME, DB_USER and DB_PASSWORD on the config.
And move this config file to var/www/html .
COPY ./srcs/wp-config.php /var/www/html


SSL Certificate Setting
In the previous ft_server article, we configured nginx port 80(HTTP) and also 443(HTTPS). Since config setting for 443 port exists, we have to set SSL key in the Dockerfile.
RUN openssl req -x509 -nodes -days 365 -subj "/C=KR/ST=Korea/L=Seoul/O=innoaca/OU=42seoul/CN=forhjy" -newkey rsa:2048 -keyout /etc/ssl/nginx-selfsigned.key -out /etc/ssl/nginx-selfsigned.crt;Change Authorization and Init bash
RUN chown -R www-data:www-data *RUN chmod -R 755 /var/www/*COPY ./srcs/init.sh ./CMD bash init.sh
And now we are done! Check out your localhost page!
